Facade Decoration
ShellBau - How to do the entire facade decoration correctly
FACADE
The facade is the face of the building, one of the key elements determining its appearance. It is the primary protective layer of the building, designed to withstand atmospheric conditions. Therefore, it is essential to choose high-quality materials and skilled craftsmen for the job. Everything must be carefully considered because the façade provides the first impression and imparts an individual character. A good house facade should be resistant to weathering, robust, aesthetically pleasing, and ensure proper thermal and sound insulation.
There are two methods for finishing a facade: ventilated or plastered.
Ventilated facade. In such facades, there is always an air gap between the insulation material and the finish, which helps to eliminate moisture. Although ventilated facades are more expensive, they pay off in the long run, as they have a longer service life. The second option is a plastered facade. This type of facade has no ventilated gap. Polystyrene insulation is attached to the house wall, the surface is smoothed, and in the next stage, it is plastered, or clinker or ceramic tiles are glued to it.


VENTILATED FACADE


1. 1 A ventilated facade cannot fulfil the load-bearing function of a building.
1. 2 The design of ventilated facades is not intended to correct the flatness, i.e., to rectify construction defects where deviations from vertical and horizontal lines are greater than 100 mm.
1. 3 The structure of a ventilated facade is attached as a separate and independent part of the facade; for this purpose, structural calculations must be performed by the designer. The structure of a ventilated facade can be made of wood or galvanized metal, or aluminium profiles.
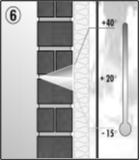
1. 4 In insulated structural envelope designs, it is necessary to prevent moisture accumulation during exploitation:
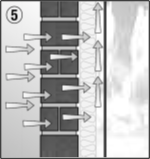
1. 4. 1 To prevent condensation of vapour on the inner cladding board/sheet of the wall, the ventilated air gap between the boards and the insulation material must be ≥30 mm but not more than 100 mm.
1. 4. 2 The upper and lower parts of the facade, as well as the corners of windows and doors, must have direct ventilation openings for outdoor air to enter.
1. 4. 3 The size of the ventilation openings is specified in the design documents but must not be less than 50 cm2 per linear (horizontal) meter of the vertical air gap.
1. 5 The basic scheme for the ventilation air gap between two (a) and one level (b) frames are shown in Fig. 7
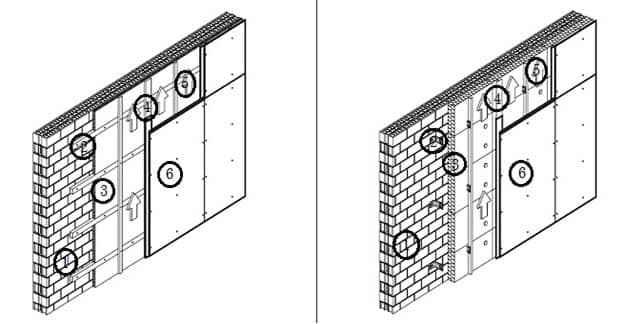
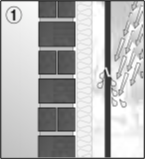
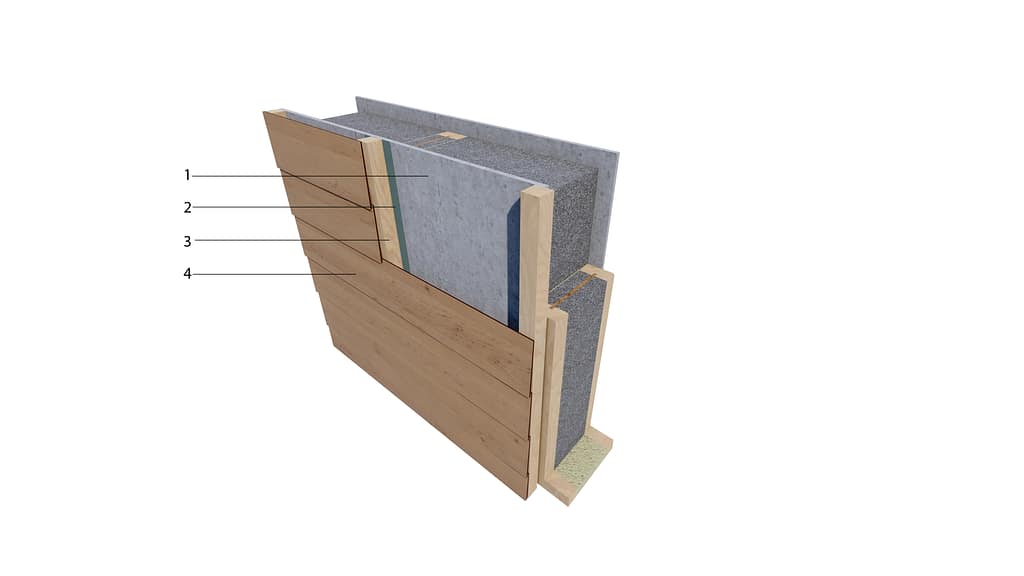
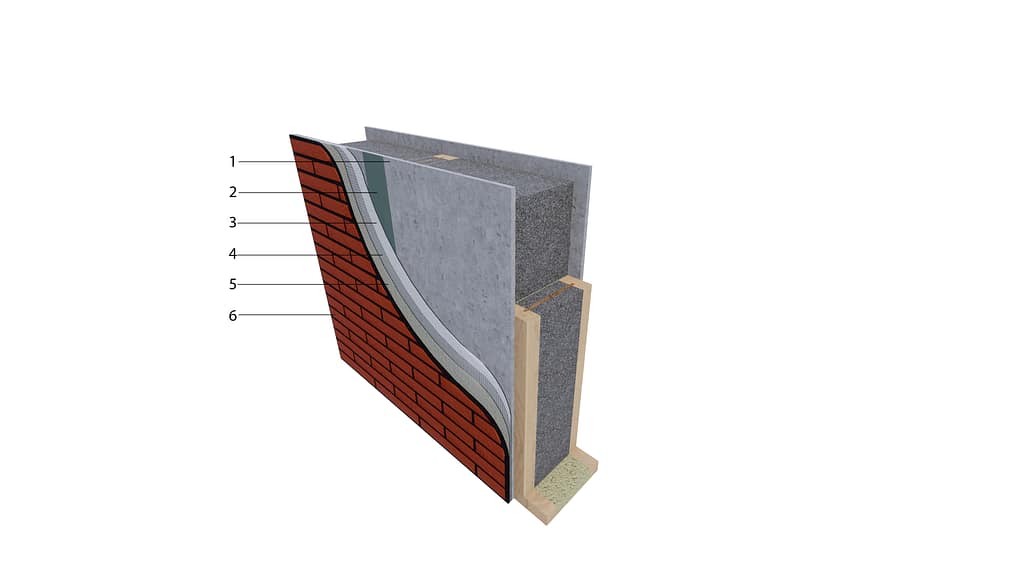
- Load-bearing structure, Shellbau panel;
- Horizontal profile, fastened to the horizontal part of the part of the panel (I-beams);
- Thermal insulation material, affixed between fastened to the profiles;
- Vertical profile – Ω (omega);
- Ventilated free space.
- Facade decoration.
- Load-bearing structure,
- Spacer brackets;
- Thermal insulation material fastened with dowels.
- Vertical profile – I-beams and L-beams the horizontal part of the panels (2T beams).
- Ventilated free space;
- Facade decoration
Fig. 7 Ventilated air gap in two (a) level and one-level (b) frameworks.
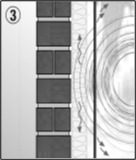
Fig. 8 Special ventilation profile *
1 – Ventilation profile against rodents

1. 6 Ventilation openings must not exceed a diameter of 10 mm or special profiled elements with ventilation openings (Fig. 7) should be used.
1. 7 The specific sizes of ventilated ducts and openings are determined by the designer, taking into account the building's purpose and height.
1. 8 When fastening panels/boards to the frame, it is essential to ensure the overall strength and stability of the facade structure to withstand wind loads, its own weight, dynamic loads, bending and cutting loads, and temperature variations.
1. 9 When installing a ventilated facade, special attention should be given to the compatibility of materials used (e.g., aluminium elements should not come into contact with galvanized elements to avoid electrochemical corrosion zones).
2. The ventilated facade system is installed according to design requirements and must comply with construction specifications
The primary types of finishes for ventilated facades may include the following:
- „Shellbau“ Panels
- Waterproofing
- Bag 45mm (for air gap)
- Facade finishing panels
1. 1 Fiber cement panels. Fiber cement products are made using Portland cement, silica, water, and binders. These panels can be coloured throughout their entire volume (homogeneous) or have a painted surface.
1. 2 Aluminium composite panels. Aluminium composite panels consist of a non-toxic and non-combustible (with a fire rating for facades of at least B s1 d0) inner layer of polyethylene and are covered on both sides with highly durable aluminium alloy sheets (0.5 mm on both sides). The surface is then coated with a PVDF finish produced through continuous composite technology.
1. 3 High Pressure Laminates (HPL). HPL panels have a core layer of paper (cellulose) impregnated with resins and compressed at high temperatures. The outer layer comes in various patterns and colours of paper coated with acrylic resin. The method used to apply the surface finish to HPL panels is essential, whether acrylic is a separate layer or pressed. This affects the strength of the panels and their resistance to impacts, scratches, water, and UV radiation.
2. 1 Fiber cement cladding panels. Fiber cement products are made using Portland cement, silica, water, and binders. These are the most durable cladding panels available.
2. 2 Wooden cladding panels. Wooden cladding panels for facades can be categorised as follows:
2. 2. 1 Painted wooden cladding panels. The most cost-effective choice but requiring annual maintenance.
2. 2. 2 Thermo-treated wood. Additionally, it can be oiled. Thermo-treated cladding panels do not warp, nor crack, and have no knots unlike pine or spruce. They require less maintenance compared to natural wooden cladding. Thermal wood treatment involves heating the wood to temperatures between +185 to +215°C, which changes its properties. The treatment consists of heating the wood to a temperature where water evaporates from the wood, creating a protective function for the wood.
2. 2. 3 Burnt timber cladding. Timber is burned at high temperatures using automated machines.
- Later, the wood is cooled, processed with special brushes, giving it an aged appearance. The wood is then
- Rinsed, and dust is removed. The final step is oiling. This step is crucial as the oil provides additional
- protection and colour to the wood. Burnt timber requires minimal maintenance.
3.1 Slate roof tiles. Slate is a natural rock known for its low water absorption and resistance to harmful atmospheric conditions. These are natural properties of slate that ensure the longevity of this facade or roof covering.
3.2 Concrete roof tiles. Concrete, a mixture of cement and sand, is the main material used in the production of these tiles. However, unlike ceramics, this roofing is not burnt at high temperatures but rather pressed.
The type of ventilated façade cladding is based on aesthetic and functional characteristics. There are no significant functional differences among the main types of panels and cladding but there may be differences in terms of fire resistance and longevity. It is essential to choose a reliable manufacturer because products of the same type can have significant differences depending on the production technology, materials used, and adherence to production processes. The manufacturer or its product seller should provide certificates and test data for the panels or cladding, allowing you to identify quality products. Consider resistance to atmospheric conditions, as it affects the fading rate of the panels or cladding colours. Consider UV resistance, the number of freeze-thaw cycles the panel or cladding can withstand, water absorption, resistance to pollutants, salts, expansion coefficient, impact resistance, scratch resistance, and fire rating. It is crucial that the panel or cladding is suitable for the local climatic conditions, and the ease of maintenance should also be considered. The dimensions of the panels or cladding can vary widely.
PLASTERED FACADE
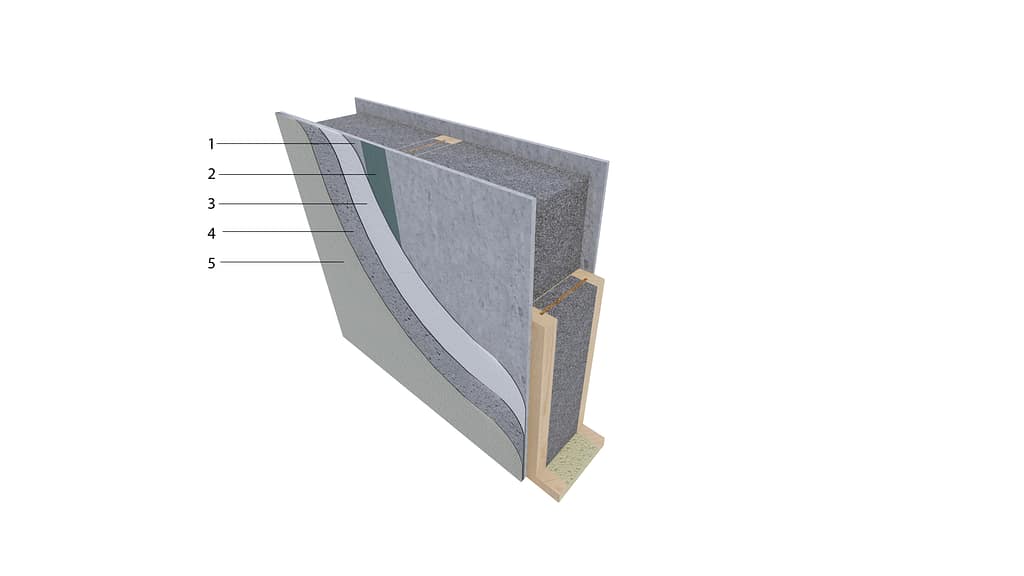
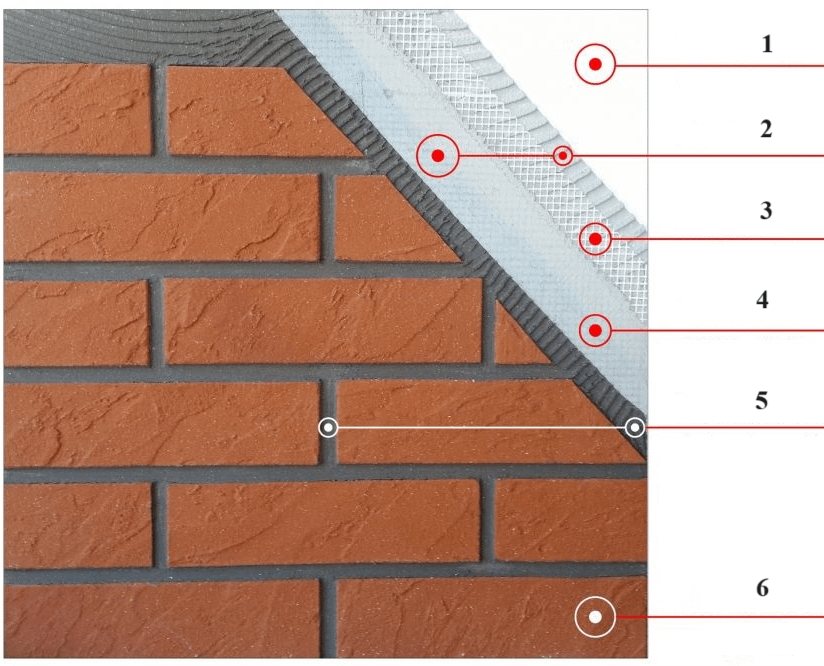
- SHELLBAU panel
- Reinforcing mesh
- Reinforcement mortar
4. Decorative plaster
5. Fig. Rendered facade.
Decorative plaster protects exterior walls from weathering and enhances the facade’s appearance. The properties of decorative plaster are determined by the binding material used in its production. The finish with structural plaster is one of the most cost-effective solutions.
The installation of structural plaster and panels includes the priming of SHELLBAU panels.
Prior to reinforcing, it is necessary to prime the surface. Priming binds dust and improves the adhesion of the reinforcement mortar to the substrate.
To prevent diagonal cracks, first apply diagonal 30×20 cm reinforcement strips on all four corners of the facade. The reinforcement layer uses a reinforcement plaster and reinforcement mesh that belong to the system. Here's the process: apply the reinforcement plaster over the entire fabric width on the primed insulation panels and embed the reinforcement mesh, overlapping one mesh strip with another by about 10 cm. Then, while the layer is still wet, plaster it puttied, so that the reinforcement fabric is completely covered. It is not recommended to plaster the reinforcement layer multiple times. If it is necessary to cut the fabric mesh, for example, around scaffolding anchors, this area should later be patched with a piece of fabric mesh to ensure complete reinforcement coverage.
To ensure good adhesion of the finishing plaster, it is recommended to prime the dried reinforcement layer. If the decorative plaster is to be painted, use a paint primer. For decoration, you can use facade paint or decorative plaster. When using decorative plaster, apply it with a stainless steel trowel continuously (apply from top to bottom, pressing the new application into the previously applied wet surface). Immediately after, level it to the desired texture layer thickness and shape the surface of the plaster with a plastic or other suitable trowel. When freely modelling the texture of the plaster, avoid sharp differences in material layer thickness to prevent cracking as the plaster dries and shrinks. To avoid visible plaster joints, there should be sufficient number of workers on each part of the scaffold. The plaster layer should be evenly finished while the surface is still wet. Avoid working in direct sunlight, strong winds, or rain. For decoration, you can also use special facade or base tiles by applying them with adhesive on the reinforcement layer using appropriate adhesives. Decorative plaster can also be applied mechanically. This involves the use of a convenient plaster spraying machine, which greatly facilitates and speeds up the work. Spraying produces a textured plaster finish, covers a large facade area, leaves no joints, and provides a consistent pattern.
TILING
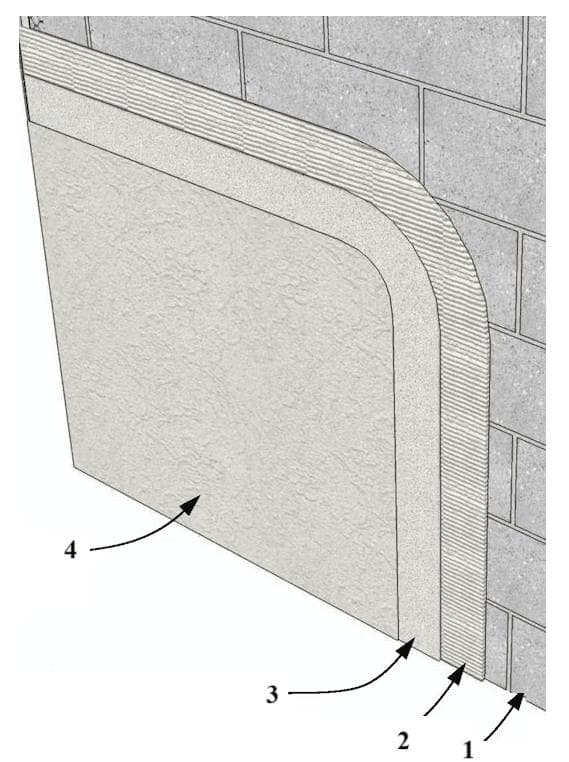
- SHELLBAU panel
- Reinforcing compound
- Reinforcement mesh
5. Tile adhesive
6. Tiles
In the first step, adhesive is applied to the wall surface using a notched trowel (similar to the process of installing regular ceramic tiles). This is the correct method, suitable for those with some experience. When applying adhesive to the wall, it is recommended not to cover more than 1 m² at a time, as the applied adhesive can start to drying within 10-30 minutes. Sometimes, it is recommended to moisten the clinker tiles with water before applying the adhesive (depending on the manufacturer’s recommendations).
The size of the notches on the trowel depends on the size and width of the clinker tiles. Larger clinker tiles require larger notches on the trowel. For smaller tiles, 6-8 mm high notches are sufficient, while for larger ones, 10-12 mm notches are needed. The standard dimensions of clinker tiles are typically around 24-25 cm in length and 5-7 cm in width with a thickness of about 10 mm. There are also special “elongated” clinker tiles with lengths ranging to 29-36 cm. The tiling of clinker tiles begins with the second row from the bottom. The first row or the skirting board closest to the floor is left empty for now. It is covered with clinker tiles at the very end of the work to conceal floor irregularities, and the clinker tiles can be cut to width to conceal any defects. There should be no voids left in the adhesive layer under the clinker tiles.
Check the evenness of the adhesive mass applied to the wall surface. Gaps between tiles are necessary and typically range from 4 mm to 10 mm in width. The width of the gaps depends on the environmental conditions and the hardness of the mortar. To maintain consistent gaps between clinker tiles, insert spacers between them. If a clinker tile has been improperly installed, it can be adjusted within 10-15 minutes after installation. Each row of clinker tiles is checked using a level or guided by a tight string.